Lap Steel Simulator
Introduction
This is a bit of a weird one. I’m learning to play the lap steel guitar in my spare time and wanted a piece of software to help me try out different tunings, find chords across the fretboard, and basically emulate the feel of playing a lap steel when sitting in front of a keyboard.
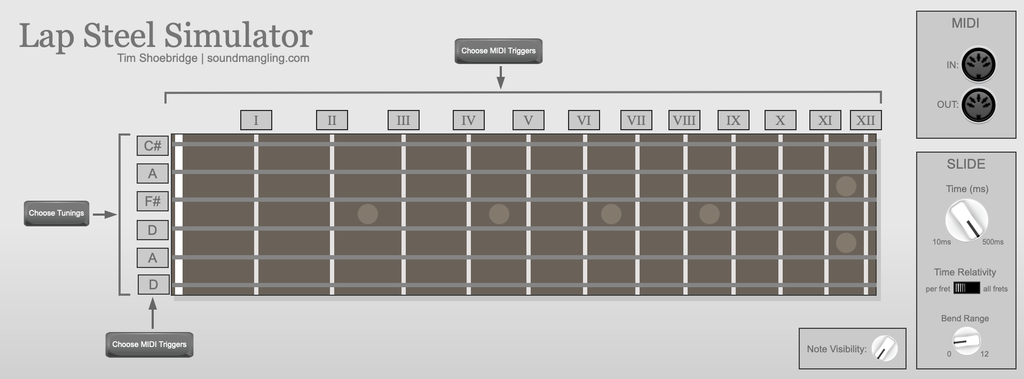
Lap Steel Simulator is the result, it doesn’t make any sounds itself but sits in between your MIDI keyboard and any MIDI-enabled sound source of your choice. You use your keyboard to simulate the lap steel fretboard and strings and let the Simulator send the correct MIDI message note-on and note-offs to your sound source. You could use a rompler with a nice electric guitar preset, or diverge completely from reality and use a synth to create any sounds you like.
You will need a MIDI module in Voltage Modular to connect to your sound source, Cherry Audio supply one at an extremely reasonable price so please check it out.
(Youtube video to come)
Availability
This software tool is distributed as a module for Cherry Audio’s Voltage Modular product. Voltage Modular runs on Windows and Apple Mac, both as a standalone application and as a VST plugin for your DAW. Modules can be purchased and downloaded using Voltage Modular’s online store. Voltage Modular itself is completely free to download. Please check out Cherry Audio’s website for more information here.
Lap Steel Simulator User Guide
(Note: I will call Lap Steel Simulator just “simulator” in this user guide)
MIDI In
Use this socket to supply MIDI to Simulator. You do not have to put a cable into this socket, by default Simulator will take MIDI from Voltage Modular’s control panel, so just configure Voltage Modular itself to connect to whatever MIDI controller you want to use and Simulator will get those MIDI messages.
MIDI Out
use this socket to output MIDI from Simulator. You will need to connect this output to a MIDI interface module that can connect to your sound source of choice. Cherry Audio provide a really good MIDI interface module so please check it out.
MIDI Triggers
You will see two “Set MIDI Triggers” buttons; one to set triggers for the frets and another to set triggers for plucking the strings. Click one of the buttons and you will see the current MIDI assignments for each fret or string. When you play the corresponding notes on your MIDI keyboard they will have the effect of selecting a fret or plucking a string. To actually play the Lap Steel you will want to first select a fret, keep that key held down, then pluck a string by briefly holding down that corresponding key. The note will sustain until you let go of the fret key. It’s all easier to demonstrate than explain so please do check out my instructional video!
You can easily change MIDI trigger key assignments by clicking on an existing assignment, pressing a key on your MIDI keyboard, and the new MIDI trigger value will be displayed.
Tunings
The same way that you can select keys on your MIDI keyboard to select the notes that will trigger fret selection and string plucks, you can use your MIDI keyboard to select the open tuning of each string. Just click on the “Choose Tunings” button, select a string’s current open note assignment, and then press a key on your keyboard to set the new open tuning value. The note you choose will be the note you hear when you pluck the string with no fret selected.
Note Visibility
If you want to see the note assignments across the entire fretboard for the open tunings you have set then turn up this visibility control. This really helps you to find chords across the fretboard.
Slide
No simulation of a lap steel guitar would be complete without the ability to slide notes up and down. Simulator achieves this by controlling the pitch bend of your sound source. If it supports it, I would suggest that you set your sound source’s pitch bend range to be +/- 12 semitones, this will allow you to slide up or down the entire fretboard if you want to. Whatever pitch bend range you have set in your sound source, please set the Simulator’s Bend Range control to match. Setting it to zero will disable pitch bend completely.
To perform a pitch bend, keep the current fret held down while pressing the next fret you want to slide up or down to (ie. legato style). As long as that next fret is within pitch bend range Simulator will pitch bend to that fret, you will hear any notes that are ringing out bend in pitch. How fast the pitch bend takes depends on two other controls: The Time control sets the pitch bend time in milliseconds, The Relativity switch sets whether the time you have selected is the time taken to bend one semi-tone or whether it is the time taken to bend however many semi-tones are needed to reach your chosen next fret. See my instructional video for examples of how this Slide capability works, it is quite powerful.