PolyChain DIY
Introduction
This module allows you to polychain together up to eight separate instruments. Instruments can be hardware synths, electronic keyboards, samplers, grooveboxes, multi-timbral sound sources, ecen soft synths running as a VST in your DAW. If you can connect to the instrument via MIDI from your computer then PolyChain DIY can control it. Choose from four different polychain algorithms, create polychain zones across your keyboard, transpose your instruments, set their priority, control pan spread and other basic sound attributes if your synths have support support via MIDI CC automation.
PolyChain DIY is actually a bundle of three modules: the main polychain module itself, a stand-alone MIDI Map editor, and a software controller for controlling basic synth parameters on all your instruments simultaneously.
Availability
This software tool is distributed as a module for Cherry Audio’s Voltage Modular product. Voltage Modular runs on Windows and Apple Mac, both as a standalone application and as a VST plugin for your DAW. Modules can be purchased and downloaded using Voltage Modular’s online store. Voltage Modular itself is completely free to download. Please check out Cherry Audio’s website for more information here.
Walk-through
For examples of what PolyChain DIY can do and detailed explanations of its features, check out the following video:
PolyChain DIY User Guide
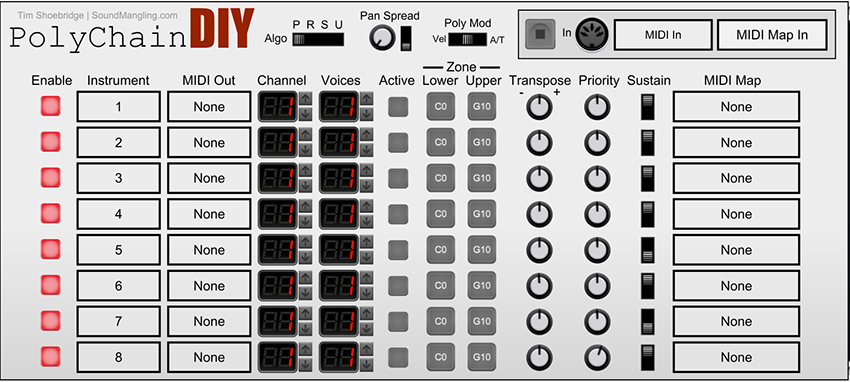
MIDI IN
Click on this control to choose an input device such as a keyboard or sequencer. The list of devices you see will depend on the MIDI devices registered on your computer. You may also use the MIDI DIN socket to connect to Voltage Modular when running as a VST inside a DAW as well as other Voltage Modular modules that provide MIDI messages.
MIDI Map In
Click on this control to select a MIDI Map file for your input device. This MIDI Map file will tell PolyChain DIY which MIDI CC messages to expect to control your instruments via MIDI automation. See “MIDI Map” further down in this user guide for more details.
All Notes Off
There is an unmarked button to the left of “MIDI In”. This button will send an “All Notes Off” MIDI command to all your connected instruments.
Enable
Click this button to enable or disable individual instruments. You an hold CTRL and click to solo an instrument and SHIFT and click to enable all instruments.
Instrument
This is a text field which describes each instrument. By default it is simply a number but you can enter your own text to help describe what physical or software device each instrument is communicating with.
MIDI Out
Click on this control to choose a MIDI device that connects to your instrument. You can choose “To Host” to route MIDI for this instrument back into your DAW when running as a VST plugin.
Channel
This is the MIDI channel for your instrument. Set it to the correct value that your instrument will be listening to. MIDI Out plus MIDI Channel is what uniquely identifies an instrument and ensure that the correct MIDI messages will be sent to it.
Voices
Set the number of voices that your instrument supports. This may be dependent on the patch your instrument is playing (eg. many poly synths can play monophonic patches). It is perfectly fine – and sometimes optimal – to set the voice count to less than your instrument supports for creative purposes, but do not set the voice count too high or else PolyChain DIY will produce unexpected results and may cause hung notes.
Active
This indicator will light up when an instrument is actively playing a note. The number of voices currently in use for each instrument will be displayed.
Zone Lower & Upper
By default, each instrument can be played across the entire range of the keyboard. However you can limit this range and create zones within which one or more or no instruments will play. Click and hold down either the lower or upper buttons and press a key on your keyboard. Once the note is registered on the button you can release it. Double-click a button to return it to the default value.
Transpose
You can transpose each instrument up or down by a maximum of 48 semitones. Transposition affects the notes that are sent to your instruments, not any zones you may have defined.
Priority
You can set the relative priority of instruments which will in turn affect the probability that an instrument will be chosen to play a note. The “P” and “R” polychain algorithms are affected by priority, see the “Polychain Algorithm” section later in this user guide for details. Priority range is 1-100 with the default being 50.
Sustain
This switch can be set to disable sustain pedal messages from being sent to an instrument. By default (the upward position) sustain pedal messages are routed to all connected instruments. The reason for disabling sustain pedal – other than a creative choice – is to ensure that PolyChain DIY continues to voice steal as needed when the sustain pedal is active. PolyChain DIY can not voice steal from an instrument which has run out of free voices is any of the used voices are a result of sustain pedal use.
MIDI Map
Click this control to choose a MIDI Map for your instrument. MIDI Map files are used to tell PolyChain DIY what MIDI CC messages to send in order to automate certain basic synth parameters including adjustment to filter cutoff, resonance, envelope settings etc. See the section below on MIDI Maps for more information.
Algo
This control specifies which poly-chain algorithm to use. The choices are as follows:
P – Stands for Polyphony. This algorithm will maximise polyphony by utilising the available voice count of all instruments. It will only voice steal when all free voices have been consumed. Choice of voice is random but affected by the Priority control.
R – Stands for Random. This algorithm will choose an instrument to play a note in a totally random manner, regardless of free voice count. It will voice steal is required to fulfill its choice but only if the sustain pedal is not depressed or else the instrument is set to ignore sustain pedal messages.
S – Stands for Sequential. This algorithm will choose an instrument to play in strict sequential order. Like “R” it will voice steal if necessary to fulfill its choice but the same caveats apply regarding sustain pedal.
U – Stands for Unison. This algorithm will choose all instruments to play and will voice steal if necessary, sustain pedal caveats apply.
Pan Spread
The rotary control will set the amount of stereo pan spread to be applied across all instruments. The switch selects the pan spread algorithm that will be used. Instruments can only be pan spread if a MIDI Map file is supplied with a “PAN=nnn” entry in, in other words your instrument needs to be able to adjust voice pan using a single MIDI CC command.
Tip: Pan spread works best when instruments have a voice count of just one, since often pan is a global rather than per-note automation parameter.
The pan spread algorithms are as follows:
Top – Ping pong algorithm utilising maximum possible spread as set by the rotary control.
Middle – Ping pong algorithm utilising a random spread somewhere between center and the value set by the rotary control.
Bottom – A random algorithm with which both the choice of channel and spread are randomly chosen.
Poly Mod
Use this control to choose between velocity or polyphonic aftertouch as the input polyphonic expression to be passed to all instruments. The switch center position disables poly mod. If either velocity or poly a/t is chosen, then any expression received by PolyChain DIY will be converted into Modwheel automation (MIDI CC = 1) and sent to each instrument. In this way, PolyChain DIY can be used to modulate even the most basic synthesisers including many vintage synths and copies of vintage synths.
Tip: Poly Mod works best when instruments are restricted to having a voice count of just one, since this will result in the mod wheel automation being applied on a per-note basis.
About MIDI Maps
MIDI Maps are simple text files. Each line in the text file contains a parameter name and a value in the following format: PARAMETER NAME=value
The supported names are as follows:
CUTOFF
RESONANCE
FILTER EG
PAN
FILTER ATTACK
FILTER DECAY
FILTER SUSTAIN
FILTER RELEASE
AMP ATTACK
AMP DECAY
AMP SUSTAIN
AMP RELEASE
By adding entries to a MIDI Map file and associating it with an instrument, you tell PolyChain DIY how to automate basic synth parameters on that instrument. And by supplying a MIDI Map file for the MIDI input, you are telling PolyChain DIY what MIDI CC messages to expect from a hardware MIDI Controller or keyboard. PolyChain DIY will perform a translation from input MIDI CC to each instrument’s expected MIDI CC so that synth parameters can be controlled consistently across all instruments in a synchronised way.
Note that the implementation of MIDI CC in PolyChain DIY is basic, it is assumed that values will be from 0 to 127, NRPN’s are not supported, how compatible individual instruments will be depends on how they interpret MIDI CCs themselves. For example, one synth might interpret filter EG positively from 0 to 127, whereas another synth might interpret 0-63 as negative modulation and 64-127 as positive modulation. There is no way currently in the MIDI Map files to capture these differences in interpretation of MIDI CC values by different instruments.
Additional Tools
There are two additional tools supplied with PolyChain DIY. Their use is optional.
MIDI Map Editor
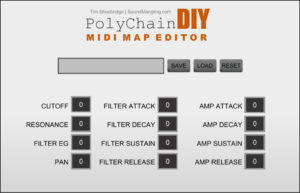
Use this tool to create and edit MIDI Map files on your computer which can then be referenced by PolyChain DIY either as an input controller map or an output instrument map. Using this tool ensures there are no invalid characters or values in the MIDI Map files.
MIDI Controller
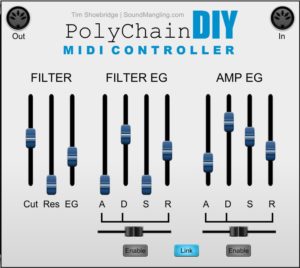
Use this tool to control basic synth parameters across all your instruments. You must have referenced MIDI Map files for your instruments containing a valid MIDI CC for the specific parameter you want to automate. Connect the MIDI Controller to PolyChain DIY by dragging a cable from the controller’s MIDI out socket into PolyChain DIY’s MIDI in socket. Make sure no MIDI Map In is specified or else PolyChain DIY will not understand the MIDI CC’s sent my the MIDI Controller module.
hello,
Great modules
Just one question,
If i have a few midi input modules in VM can i assign these by the midi out menu in the PolyChainDIY?
Or is it only possible to assign midi outside VM?
Hi, How do your modules accept MIDI? Via a virtual DIN socket or else direct connection to registered MIDI devices? PolyChain DIY can only connect to registered MIDI devices or else route MIDI back to a DAW when running as a VST. So I think the way you could do what you would like is to run each of your modules in a separate instance of VM inside a DAW and then use the DAW to perform the necessary MIDI routing for you. If you take a look at the video example I walk through of controlling VST sample libraries inside a DAW then you could adapt that approach to controlling multiple VM instances instead. I haven’t tried it but it should work in theory.
thanx for the reply, i did saw the tutorial video and at the and there is an example of controling 3 spitfire audio vst’s.
Maybe i’m gonna try to connect the Polychain diy to a virtual midi (loop midi) and then see if i can catch the midi by a VM midi in module